
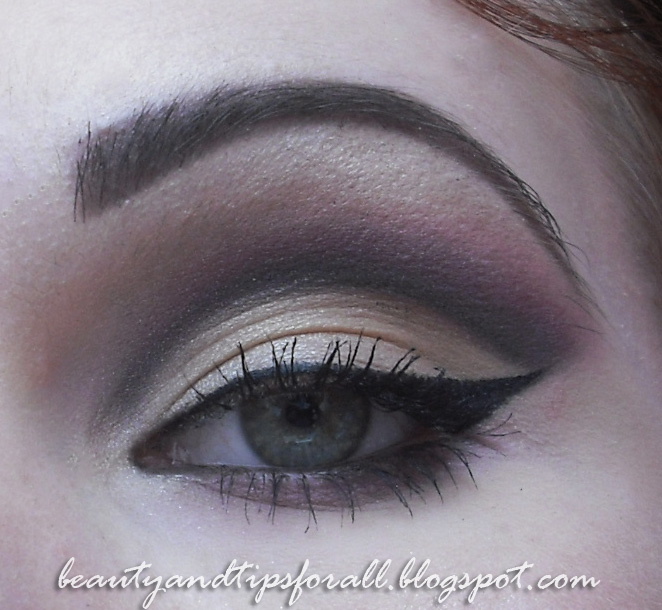
Good evening girls! I hope you had a nice weekend and that you had enough fun to last you throughout the week :D I'm posting today a more neutral and soft look, cut-crease style of course, inspired by Kristiana Z. I'm trying to lay off a bit when I go to courses with the mega colorful looks and try something more simple and neutral, yet effective and neat. I'm also posting a photo guide with the order of the colors, plus explanations and brushes you can use to get this look. I hope you like it and I'm waiting for your comments!


Produse folosite/ Products used
Fata/Face: Maybelline Affinitone Light Sand Beige, E.l.f. concealer palette, E.l.f. HD Powder
Obraji/Cheeks: Giordani Gold Bronzing Pearls
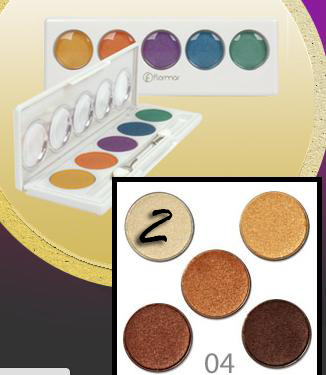
Ochi/Eyes: Too Faced Shadow Insurance, Flormar 5 eyeshadow palette, Sleek Au Naturel, Sleek PPQ, E.l.f. Eyeshadow (Ethereal), E.l.f. Gel Liner, Yves Rocher Lash Pumping Mascara.
Buze/Lips: Yves Rocher Lip Balm (Vanilla)

1. Pregatiti-va pleoapa cu primer (in cazul meu TFSI)/ Prime your lid (my case TFSI)
2. Aplicati culoarea nr.1 incepand din coltul exterior al pleoape catre interior pana la mijloc (incercati sa ramaneti sub pliu)/ Apply color no.1 starting from the outer corner of your lid until the middle (try to stay under the crease).
3. Aplicati culoarea nr.2 incepand din coltul interior al pleoapei pana la mijloc, suprapunand-o peste cea aplicata anterior/ Apply color no.2 starting from the inner corner of your lid to the middle, overlaying it over the one you applied previously.
4. Trasati cu o pensula subtire o linie care sa urmareasca forma pliului incepand din partea exterioara spre partea inerioara. Incercati sa construiti culoarea treptat, si nu sa aplicati de-odata prea mult negru. (Culoarea nr.3) / Trace with a thin brush a line that follows your crease shape starting from the outer part of your eye towards the inner part. Build the color step by step, don't apply the black color at once. (Color no.3)
5. Cu o pensula nu foarte mare treceti usor peste culoarea 3 pentru a crea o trecere intre culoare si pleoapa pana obtineti un efect degrade. / With a rather small brush go over color no.3 to create a blending between the color and the lid until you get a gradient efect.
6. Aplicati peste culoarea anterioara culoarea nr.4, treptat, "blenduind" culorile intre ele in asa fel incat sa treceti gradat de la negru la maron si treceti mai sus de culoarea neagra./ Apply over the previous color, the color no.4, blending the colors so that you go gradually from black up to marron. Take the color over the black crease color.
7. Pentru a face trecerea intre culoarea nr.4 si restul pleoapei aplicati peste un amestec intre culorile 5 si 6 pana obtineti efectul gradat./ To make the transition between color no.4 and the rest of the lid apply over a mix between colors no. 5 and 6 until you get a gradient-like effect.
8. Aplicati highlight-ul (culoarea nr.7) sub spranceana./ Apply the highlight (Color no.7) under the brow bone.
9. Aplicati culoarea nr. 4 pe pleoapa inferioara intr-un strat subtire./ Apply color no. 4 on the lower lash line in a thin layer.
10. Trasati cu ajutorul unei pensule subtiri un contur cat-eye pe pleoapa superioara. Incercati sa mentineti linia cat mai aproape de linia genelor./ With a thin brush trace a cat-eye contour on the upper lid. Try to keep the line as close as possible to the lash line.
11. Aplicati rimel si sunteti gata! / Coat your lashes with mascara and you're ready!
Ptr. pasul/ Step: 5, 9 Ptr. pasul/ Steps: 1, 2,3,6,7,8 Ptr. pasul/ Step: 4


.JPG)


No comments:
Post a Comment